6. The GUI (Graphic User Interface)
The GUI has three main purposes:- Bring up a panel if the daemon needs to know user credentials.
- Give some insight into Sharity's internal status (logins, mounts).
- Provide a user-friendly way of configuration.
6.1 Help and other Basics
The GUI application comes with a context sensitive help system. The first thing you should learn is how to use the help. If you click the Help button, Sharity is in help mode. You see you are in help mode if the Help button is pressed. During help mode, the help window is active (this is the window containing the help text). When you enter the help mode, you get a short explanation how the help system works. While you are in help mode, the cursor turns into a question mark (or what X-Windows thinks is a question mark) when it is on top of a GUI element with help text associated: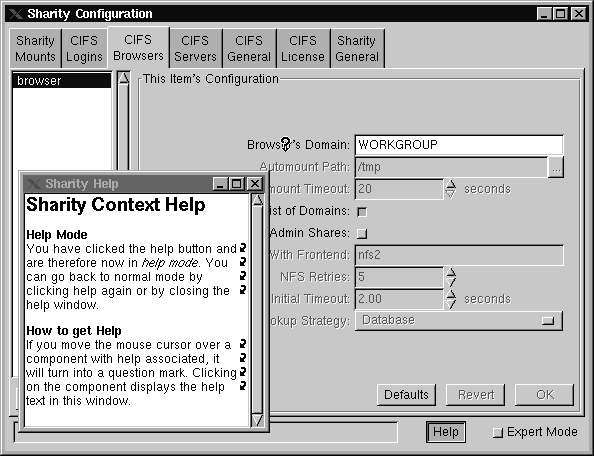
Clicking the element brings the help text into the help window. For many settings, it works more reliable to click the explaining text on the left of an input field instead of the input field. Note that the help system also works for windows popping up.
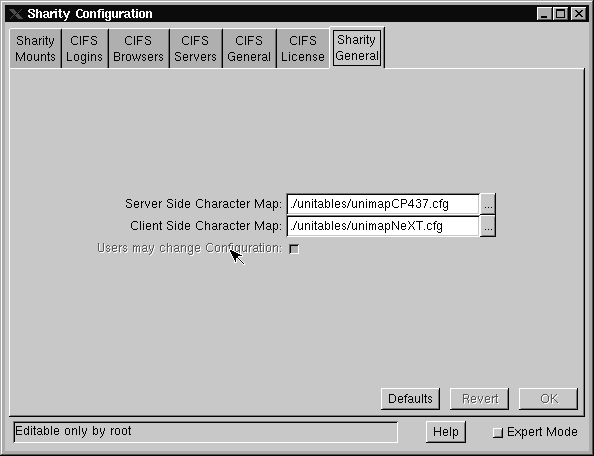
Beside the help mode, there's an other important basic concept: the status-bar and the expert mode. There are many things configurable through the GUI. You never need to touch most of them because the defaults are just fine. To give you a hint which setting may be of interest to you and which probably not, Sharity has an expert mode: In normal operation, only the important settings are editable. Most advanced settings are grayed out. If you switch to expert mode, the other settings become editable, too. If a setting is grayed out and not editable, it may be hard to find out why it can't be edited. Here comes the status-bar into play: It displays the reason why a setting is not editable if you move the mouse cursor over the setting. Here's an example for a message in the status-bar:
6.2 Login Panel
Consider the following situation: A browser is mounted at the path /CIFS. You start browsing:prompt> cd /CIFS prompt> ls -l total 3 dr-xr-xr-x 2 root 1024 May 10 14:04 Entire_Network/ dr-xr-xr-x 2 root 1024 May 10 14:04 Gate/ dr-xr-xr-x 2 root 1024 May 10 14:04 Zaphod/We see two CIFS servers in the network. We want to access files on server Gate:
prompt> cd Gate
prompt> ls -l
The ls -l command hangs and the login panel pops up (provided that you run the Sharity GUI, of course):
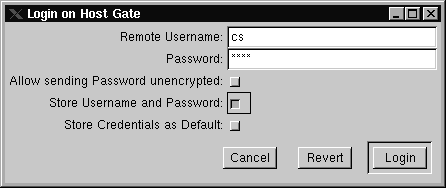
The username is preset to the local Unix username. You have the option to store your credentials for this server or to store them as default for all servers. We decided to store username and password in the above example because only one person has access to the machine and storing passwords should be safe. Please be sure to understand the security implications before you store passwords! See the online help associated with the checkbox for details. After entering the password, we click Login and the original ls -l proceeds:
total 5
lr-xr-xr-x  1 root   1024 May 10 14:07 Cs -> /tmp/Gate.Cs/@
lr-xr-xr-x  1 root   1024 May 10 14:07 Faxspool -> /tmp/Gate.Faxspool/@
lr-xr-xr-x  1 root   1024 May 10 14:07 Homes -> /tmp/Gate.Homes/@
lr-xr-xr-x  1 root   1024 May 10 14:07 Public -> /tmp/Gate.Public/@
lr-xr-xr-x  1 root   1024 May 10 14:07 Root -> /tmp/Gate.Root/@
From now on we are logged in to the server "gate" and can access any data as user "cs". We can change to one of the shares and list the contents:
prompt> cd Root
prompt> ls -l
total 474
dr-xr-xr-x  2 cs        131072 Dec  5 18:32 Net/
-r--r--r--  1 cs         87631 Mar 15  1998 System.map
dr-xr-xr-x  2 cs        131072 Dec 10 16:30 bin/
dr-xr-xr-x  2 cs        131072 Aug 22  1998 boot/
dr-xr-xr-x  2 cs        131072 Sep 14  1995 cdrom/
dr-xr-xr-x  2 cs        131072 Apr 29 11:51 dev/
dr-xr-xr-x  2 cs        131072 May  6 12:26 etc/
dr-xr-xr-x  2 cs        131072 Sep 14  1995 floppy/
dr-xr-xr-x  2 cs        131072 Dec 18 00:05 home/
dr-xr-xr-x  2 cs        131072 Jul 18  1996 initrd/
dr-xr-xr-x  2 cs        131072 Apr 16 17:29 lib/
dr-xr-xr-x  2 cs        131072 Feb  3 18:10 linux/
dr-xr-xr-x  2 cs        131072 Mar 15  1998 lost+found/
dr-xr-xr-x  2 cs        131072 Sep 14  1995 mnt/
dr-xr-xr-x  2 cs        131072 Apr 29 11:51 proc/
dr-xr-xr-x  2 cs        131072 May  3 22:57 root/
dr-xr-xr-x  2 cs        131072 Dec 10 16:31 sbin/
drwxrwxrwx  2 cs        131072 May 10 12:44 tmp/
dr-xr-xr-x  2 cs        131072 Aug 21  1998 usr/
dr-xr-xr-x  2 cs        131072 Sep 21  1998 var/
-r--r--r--  1 cs        397004 Mar 15  1998 vmlinuz
6.3 Inspecting Sharity's internal Status
Sharity's internal status consists of active and stored mounts and the active and stored logins. Let's start with the logins because most users will probably have to manage their login themselves. By selecting the CIFS Logins section in the configuration window, you get a screen like this: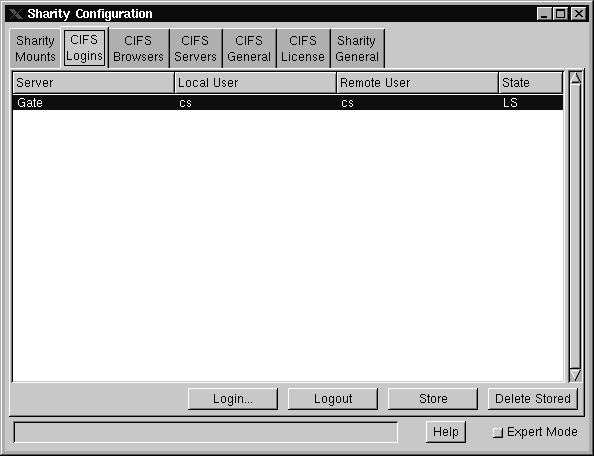
You can see that the local user "cs" is logged in to the server "Gate" as the remote user "cs". The login is active, which can be seen by the letter "L" in the status field and it is stored, which is represented by "S". We can now manipulate the login, if we like. By clicking the button Delete Stored, the login will be removed from the database and the status will change to "L" because we are still logged in. We can now store it again by clicking the button Store. By clicking the Logout button, the login becomes inactive and will stay stored only (the status will display "S" only). With the button Login... we can bring up the login panel for an arbitrary server in the network.
There's an other status display: the list of mounts. By clicking the CIFS Mounts tab, you get the following screen:
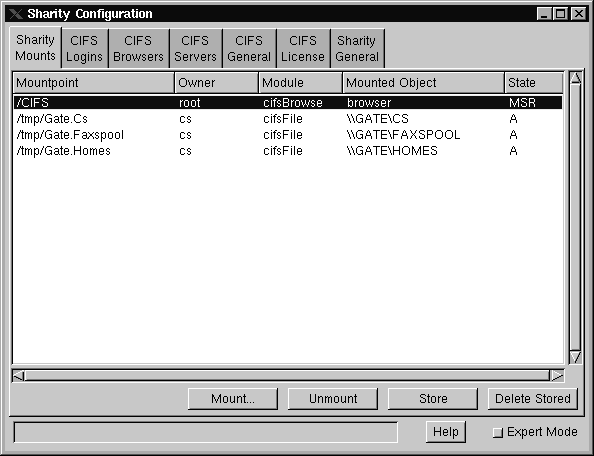
You see that we have one browser mounted at the path /CIFS, which has already been used in the previous examples. Automatically mounted by this browser are the shares of server "Gate". The mounts can be manipulated in a similar way as the logins with the buttons. If you are owner of a mount, you can store it or delete a stored record. You can also decide to unmount it. If you click the Mount... button, you get the mount dialog for manual mounting.
6.4 Configuration
The rest of the sections in the main window are for setting configuration options. Please use the online help to find out what the various settings do. It's worth noting that you probably don't need to change any of the values except:- In section CIFS Browsers the Browser's Domain, which is the domain you see in /CIFS,
- in section CIFS General the Default Domain and the WINS server,
- whether these configuration settings should be changeable by users other than root, and
- in section CIFS License your license key, if you have one.
Sharity Manual 2.9 Beta 7 | Copyright (C) 2004 OBJECTIVE DEVELOPMENT Software GmbH | http://www.obdev.at/