6. The GUI (Graphic User Interface)
The GUI has three main purposes:- Bring up a panel if the daemon needs to know user credentials.
- Give some insight into Sharity's internal status (logins, mounts).
- Provide a user-friendly way of configuration.
6.1 The Basics: Help and Expert Mode
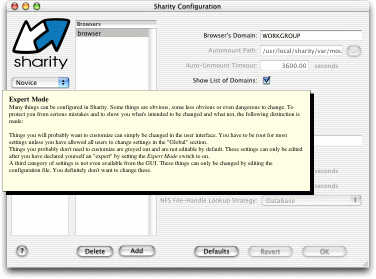
 Sharity's configuration may look complex at the first glance. There are so many configuration options... To make your life easier, we have introduced two basic concepts: Context Help and Expert Mode. From the multitude of options, only a couple are really relevant for you. To distinguish the relevant options from the rarely needed, we use the Expert Mode / Novice Mode switch. In Novice Mode, only the relevant options are editable, the others are grayed out. If you really need to change a more esoteric setting, switch to Expert Mode and the previously inactive fields will become editable.
To find out more about a configuration option or a control (like e.g. a button), click the question mark button on the bottom left side of Sharity's main window. The mouse pointer turns into a question mark. With this question mark click the control or setting in question. Sharity will pop up a window explaining the control or setting. If a setting is not editable, Sharity will also tell you why.
6.2 Accessing a Share: Login Panel
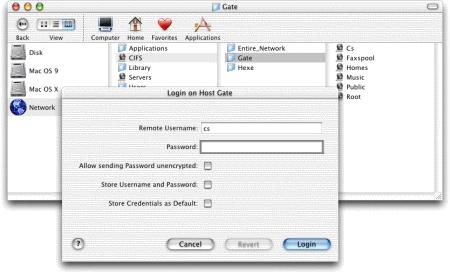
 Let's assume that you have started a new workday, booted your computer, the Sharity GUI application is started automatically and you now want to access a file located on a Windows computer. You open a Finder window, navigate to the Network volume at Finder's root, select the CIFS folder and find the computer where your file is located. You click on it and a login panel opens. You enter your remote user name and password, click "Login" and see the list of shares on the computer. You select your share, then the folder and there you find the file you want to edit. You double-click it and it opens in the associated application....
From now on Sharity knows your credentials for the server and won't ask for a password again unless you log out. If you want to permanently store your credentials, set the "Store Username and Password" checkbox. If other people have access to your computer, please read the associated online help before you do so because storing passwords is inherently insecure!
6.3 Inspecting Sharity's internal Status
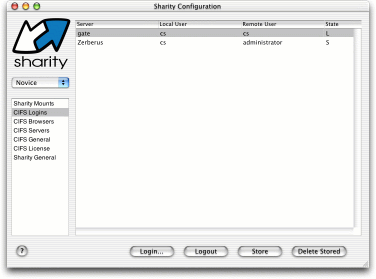
 Sharity's internal status consists of active and stored mounts and the active and stored logins. Let's start with the logins because most users will probably have to manage their login themselves. Mounts are usually handled by the automounter. By selecting the CIFS Logins section in the main window, you get to an overview of current logins (see the screenshot on the right). You can see that the local user "cs" is logged in to the server "Gate" as the remote user "cs". The login is active, which can be seen by the letter "L" in the status field. An other login at server "Zerberus" has been stored, which is represented by status "S". We can now manipulate the login, if we like. By clicking the button Delete Stored, the login will be removed from the database. With the button Login... we can bring up the login panel for an arbitrary server in the network.
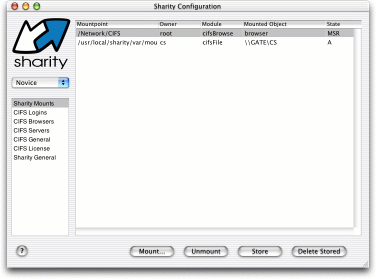
 There's an other status display: the list of mounts. By selecting the CIFS Mounts section, you get an overview of the objects currently mounted by Sharity (see screenshot on the right). You see that we have one browser mounted at the path /Network/CIFS, which has already been used in the previous examples. Automatically mounted by this browser is a share of server "Gate". The mounts can be manipulated in a similar way as the logins with the buttons. If you are owner of a mount, you can store it or delete a stored record. You can also decide to unmount it. If you click the Mount... button, you get the mount dialog for manual mounting.
6.4 Configuration
The rest of the sections in the main window are for setting configuration options. Please use the online help to find out what the various settings do. It's worth noting that you probably don't need to change any of the values except:- In section CIFS Browsers the Browser's Domain, which is the domain you see in /Network/CIFS,
- in section CIFS General the Default Domain and the WINS server,
- whether these configuration settings should be changeable by users other than root, and
- in section CIFS License your license key, if you have one.
Sharity Manual 2.9 | Copyright (C) 2004 OBJECTIVE DEVELOPMENT Software GmbH | http://www.obdev.at/